
How to Use a USBTiny with Atmel Studio
Cheaper ISP Programming with a USBTiny
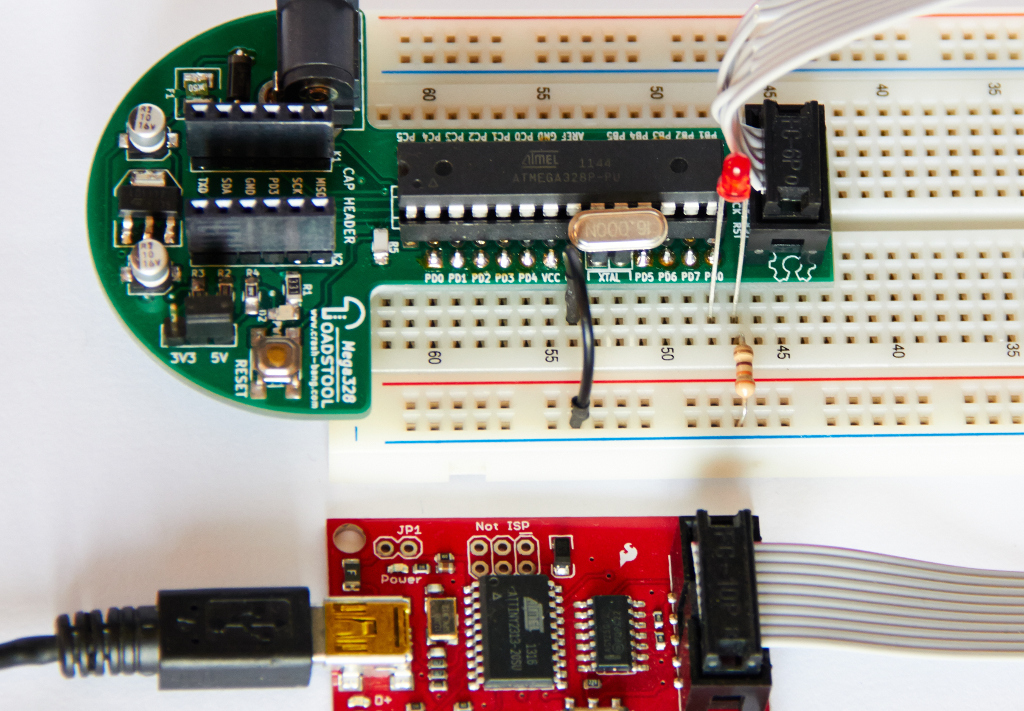
When I first started with Atmel Studio, I was a little taken aback at the cost of the programmers needed to flash my programs onto the microcontroller. After a fair bit of research I came across a great project – the USBTinyISP. This ticked a few boxes for me: it was open-source, it was easy to build yourself (if you prefer that), and it was cheap to buy (if you didn’t want to build one). I use my USBTiny all the time to program my Toadstool Boards.
Find me a USBTiny
The USBTinyISP is a collaborative effort, in the spirit of open source hardware development. Learn more about the project, how to build your own, or buy a kit over at Adafruit.
If you want to get up and running even faster, then Sparkfun sell a Pocket AVR Programmer, based on Adafruit’s USBTinyISP and Dick Streefland’s USBTiny. I went this route as I had an Atmel microcontroller that I needed to program fast.
Using the USBTiny – AVRDude
The USBTiny has its own USB drivers, and therefore differs from other programmers like the FTDI ones you’ve probably used. FTDI appears as a virtual COM port, whereas the USBTiny has native USB drivers. This makes it easier to use, as you don’t need to hunt around looking for which COM port it has attached itself to.
The upside with the USBTiny is that it works with AVRDude – a cool program with a cool name (well, not as cool as it sounds… it’s derived from “AVR Downloader/UploaDEr”). This program allows you to flash your hex program files onto a defined set of AVR microcontrollers, and is what the Arduino IDE uses in the background. Lady Ada has another useful tutorial on using AVRDude. I recommend that you download the latest version of AVRDude before continuing.
The downside of the USBTiny is that it isn’t supported by Atmel Studio.
Get the USBTiny Working with Atmel STudio
Don’t panic! Luckily Atmel Studio allows you to configure other programming tools. In this case we’re going to configure it to use AVRDude from a command-line call.
Expand each step by clicking on the heading

|
Configure Atmel Studio |


|
Program the AVR Microcontroller |

Congratulations! Let me know if you have any questions

I’ve just completed my brand new guide Arduino to AVR: Get Started in 3 Steps.
Get it now on Payhip for only $1.65.
Challenge yourself and learn how to gain the flexibility and additional control that the AVR microcontroller offers.
As a free bonus, get an ATmega328P pinout cheatsheet.
A few years ago I discovered that my programming skills could be used to make real-world things move and flash and beep - I haven't looked back since! I love sharing what I've learned along this pretty bumpy (but very exciting) journey into the world of embedded systems - and that's why this website exists. In addition to the website, I write a series for Nuts & Volts magazine that helps readers to move beyond the Arduino and into the world of AVR. I'm a dad with a couple of energetic youngsters and a really cool wife!
Good day,
Using Atmel Studio 6.2
I am using the ATiny85 chip 8 bit with the sparkfun Tiny USB programmer. Device is virtual did manage to install the basic blink using Arduino IDE. I can however not change pin config using this method and would like to use Studio 6.2.
I added the ATiny85 as per your very useful site.I do pick this up as programmer. When I run the programmer, the verbose flash past fast and can not see what was wrong.
I suspect:
1. usbtiny -p m328p … (this can be wrong)
2. $(ProjectDir)Release\$(ItemFileName) .. (i have no values in here)
Your help will be appreciated.
Blessings
Willie
Hi Willie
Thanks for the comment. Yes, you’re definitely right on the
-p m328p. The m328p is the AVRDude identifier for the ATmega328p. The identifier for the ATtiny85 is t85, so it should work if you use-p t85.You can find all the identifiers in the the avrdude.conf file – search for it in your Arduino folder structures, or if you installed WinAVR in that folder. Open avrdude.conf in a text editor (I like Geany) and search for Attiny85. You should find a section that has something like:
#------------------------------------------------------------

# ATtiny85

#------------------------------------------------------------
part
id = "t85";
desc = "ATtiny85";
The id field is the code you would use.
On your second query, the
$(ProjectDir)Release\$(ItemFileName)are set by AtmelStudio – so no input needed from you here.Let me know if you get up and running.
Cheers
Andrew
Thanks for your reply. I will give it a try.
Hi Andrew,
I purchased the T-Board-28 from Elektor Journal (September 2014) last month … and a cheap ISP programmer >> USBbap ISP (Thomas Fischl) >> from a local store … I have no problems to get it working with BASCOM AVR and the Arduino IDE to program my different Arduino UNO’s (ATmega328P) now also in BASCOM … >> now I would like to use the Atmel Studio 6.2 as my C/C++ programming IDE. The Installation of the AVR-Studio 6.2 was straigthtforward … as you said … ! All works fine including the compiling of the “Blink_28.cpp” program for the T-board-28 … ! But now my question: How to integrate the USBbap-ISP-programmer as an “uploader” in the Atmel Studio 6.2 IDE … have you any Suggestion … ? I have also already downloaded the AVRdude.exe (I know from RPi and Arduino) … ! Many thanks for an answer … !
Bruno
Hi Bruno!
Thanks for supporting the T-Board – please let me know if you have any comments!
I haven’t used the USBasp before, but from looking at the website it should work that you follow my steps above (from “Help – AVRDude with Atmel Studio”), just replace:
-c usbtinywith:
-c usbaspHope that helps – if you don’t come right please let me know.
Cheers
Andrew
Hi Andrew,
first of all … thank you very much for your answer concerning the USbap- programmer … !
My Problem is now:
I changed the ATmega328 on the Elektor T-Board against an ATmega328P … and tried to get the blink.c program running with Atmel-Studio 6.2 with the USBTiny programmer and exactly the “recepy” for AVRdude from above … and I get the error message … as well as other colleagues in the different AVRdude Forae !
Principially all works fine with the atmel Studio 6.2 … except the AVRdude program does not find the appropriate *.hex file … see in below the error message !
I compiled the T_board_28.c program ==> Atmel Studio: Start Without Debugging ==> Tools:USBTiny
The message is as follows: ==> what can I do … ??
Thanks a lot for your help,
many Kind regards, Bruno
avrdude.exe: invalid file format ‘\Users\Bruno\Documents\Atmel Studio\6.2\T_Board_28\T_Board_28\’ in update specifier
avrdude.exe: error parsing update operation ‘flash:w:C:\Users\Bruno\Documents\Atmel Studio\6.2\T_Board_28\T_Board_28\’ ===> Release\T_Board_28.hex
Problem solved – an extra space in the External Tools Arguments meant that Avrdude couldn’t find the hex file
Hey! Please, help me.
This is from my Arguments field of USBasp settings:
-c usbasp -p atmega16 -B12 -U flash:w:$(ProjectDir)Debug\$(ItemFileName).hex
I have got the same problem:
avrdude.exe: invalid file format ‘\users\beardman\Documents\Atmel Studio\7.0\GccApplication4\GccApplication4\Debug\main.hex’ in update specifier
avrdude.exe: error parsing update operation ‘flash:w:c:\users\beardman\Documents\Atmel Studio\7.0\GccApplication4\GccApplication4\Debug\main.hex’
How can I solve this?
Hi Romario
I haven’t come across that error before. Have you checked that the “main.hex” file actually exists, and that your files are being built into the Debug folder? Perhaps try using AVRDude from the command line first to troubleshoot the problem?
Maybe another reader has come across the problem and can help?
Cheers
Andrew
I sell an improved version of the AdaFruit / Sparkfun USBTiny programmer.
It’s SMD, like the SparkFun programmer, but I included a 3.3 volt LDO and allow you to select whether to supply the target with 5V, 3.3V or no target power. Additionally, there is an error in the SparkFun design. They left a blocking diode out of the BUFFEN signal path to the buffer chip. The result of that is that the target power switch doesn’t actually turn target power off, so their programmer is unsafe for targets that can be damaged by 5V power.
You can get my USB µISP from my store at tindie.geppettoelectronics.com
Thank you for the tutorial. I have it all working exept, for some reason avrdude is looking for a main.hex file in my Release folder, however there is no main.hex file there. There is a hex file but it is named after the file I open, not hex. I have verified my settings in the argument and it is correct. If I rename the file (i.e. 3pi_app3.hex to main.hex, it works just fine.
Any idea why Atmel Studio 6.x is outputing a main.hex as the file name to look for? No matter what I do I can not get a main.hex to be the output file. I guess if I renamed my project file to main.cproj or whatever it might do it.
I must be missing something. Been messing with it for over 2 hours now. I am new to AtmelStudio but not new to programming or compiling etc.
Any help appreciated.
Kevin
Thanks for the feedback. I think I’ve found the problem. Could you try the following rather:
-c usbtiny -p m328p -v -v -v -U flash:w:$(TargetDir)$(TargetName).hex:iIt works on my machine – please let me know if you come right and then I’ll update the tutorial.
Thanks
Andrew
Bingo,
What you suggested works. Below!
-c usbtiny -p m328p -v -v -v -U flash:w:$(TargetDir)$(TargetName).hex:i
I had seen this variable in their help documentation, but by their description had wrongly passed over it. Thanks! Once your tutorial is updated I would like to try and get Sparkfun to put a link to it under the USBTiny product they sell and I have.
Many thanks!
Kevin
Great, thanks for picking that up. I’ve updated the tutorial, and of course all links are appreciated (esp. from the Sparkfun guys)! Pleased you’re up and running now!
Cheers
Andrew
After copying avrdude.conf to the same directory as avrdude.exe
-c usbtiny -p t45 -v -v -v -U flash:w:$(TargetDir)$(TargetName).hex:i
worked like a charm writing to an ATTiny45, Thank you!!
Thanks for your great tutorial, however I have a question there is this programmer and development board I bought from India (www.goembedded.kicit.com). pls can you help me check whether I can use it with the atmel studio 6.x . the original configuration used winavr and cygwin software a little bit complex to use that’s the reason I want to change.
regards
Emmanuel.
Hi
The link you gave shows an error. Basically, if your programmer supports AVRDude then this method will work. You will need to change the
-c usbtinyparameter to reflect the programmer that your board is compatible with.Hope that helps
Andrew
Thanks for the excellent tutorial.
I’m able to program and write just fine with a USBTiny. But, I have a question regarding setting fuses. Pulling up the “Device Programming” window under “Tools”… the only choice that appears under the Tool pulldown is Simulator. How do I get it to recognize USBTiny?
Thanks!
Hi Gaz
Pleased it’s working!
The fuses are a little trickier. As the USBTiny isn’t natively supported by Atmel Studio, you need to use AVRDude directly from the command line to program the fuses. Here is an excerpt of an article I wrote for Elektor:
—-
1. Open a command prompt and navigate to the folder that AVRDude.exe is stored in
2. Enter the following to read the Fuse settings:
avrdude –c [programmer] -p [MCU] -U lfuse:r:-:h3. Enter the following to program a Fuse:
avrdude –c [programmer] -p [MCU] -v -U lfuse:w:0xFF:mWhere:
[programmer] is AVRDude’s code for the specific programmer you’re using (eg. usbtiny for the USBTinyISP) – refer to the file avrdude.conf for a list of these
[MCU] is AVRDude’s code for the specific MCU being programmed (eg m328 for the ATmega328)
lfuse is the fuse being programmed – use lfuse, hfuse or efuse as appropriate
0xFF is the value of the fuse being set – change this as necessary
—-
If you need a fuse calculator, try the Engbedded one. Beware, setting them incorrectly can make your MCU unprogrammable.
Good luck
Andrew
Hi, I am having issues when I attempt to flash the micro it says
My command is C:\WinAVR-20100110\bin\avrdude.exe
Argument is -c usbtiny -p m328p -v -v -v -U flash:w:$(TargetDir)$(TargetName).hex:i
Initial is C:\WinAVR-20100110\bin\
Is my initial set correctly, What is the initial supposed to be pointing to? Any help would be appreciated.
avrdude.exe: reading input file “.hex”
avrdude.exe: can’t open input file .hex: No such file or directory
avrdude.exe: write to file ‘.hex’ failed
CMD: [50 00 00 00] [00 50 00 ff]
avrdude.exe: safemode read 1, lfuse value: ff
CMD: [50 00 00 00] [00 50 00 ff]
avrdude.exe: safemode read 2, lfuse value: ff
CMD: [50 00 00 00] [00 50 00 ff]
avrdude.exe: safemode read 3, lfuse value: ff
avrdude.exe: safemode: lfuse reads as FF
CMD: [58 08 00 00] [00 58 08 de]
avrdude.exe: safemode read 1, hfuse value: de
CMD: [58 08 00 00] [00 58 08 de]
avrdude.exe: safemode read 2, hfuse value: de
CMD: [58 08 00 00] [00 58 08 de]
avrdude.exe: safemode read 3, hfuse value: de
avrdude.exe: safemode: hfuse reads as DE
CMD: [50 08 00 00] [00 50 08 fd]
avrdude.exe: safemode read 1, efuse value: 5
CMD: [50 08 00 00] [00 50 08 fd]
avrdude.exe: safemode read 2, efuse value: 5
CMD: [50 08 00 00] [00 50 08 fd]
avrdude.exe: safemode read 3, efuse value: 5
avrdude.exe: safemode: efuse reads as 5
avrdude.exe: safemode: Fuses OK
avrdude.exe done. Thank you.
Hey Ethan
Thanks for posting the question. I’m not near my USBTiny at the moment, so can’t test this – but perhaps you could give it a go and post back if it works?
Try the following argument (it seems that (TargetPath) contains the full path + filename):
-c usbtiny -p m328p -v -v -v -U flash:w:$(TargetPath):iTake a look at this section in the online AtmelStudio manual.
If this doesn’t work, then do a search in your project folder for *.hex. The error message seems to indicate that AVRDude isn’t picking up a filename.
Cheers
Andrew
Using a homemade 7-component USBTinyisp on Atmel Studio 7 and this worked perfectly, thanks!
Hi. Many thanks for the tutorial. I have used this to set up Atmel Studio 7 with my USBTinyISP. Cut and pasted your “blinky” prog with clock at 16Mhz (my breadboard uses 16Mhz). Found that the blink rate is about 10 times slower than the expected 1sec. I shortened the delay to 100ms and the Led blinks at about 1 sec. Any thoughts..
Best wishes for the Season.
George
Hi George
Thanks – pleased you enjoyed it. I would check your CKDIV8 Fuse – it could be set, slowing your CPU speed by a factor of 8. This may help:
http://www.crash-bang.com/programme-avr-fuse/
All the best to you and yours over Christmas
Andrew
First, Thank you for sharing this information.
Just like Willie Swanepoel (June 7, 2014), I am using the ATiny85 chip 8 bit with the Sparkfun Tiny USB programmer. The thing is I just installed Atmel Studio 7 Build 783.
When I reach the menu there are no sub menu . So, I am wondering how Georges (December 23, 2015) did it ?
Is there a sub menu called another name ? I tried to search if it was not hidden in some other menu, with no success.
Also, the help video is mentioning AVRdude for programmer. Is AVRdude the correct programmer for the ATtiny85 and the Sparkfun Tiny USB programmer ?
Sorry if this question seems a little dumb. This will be my very first attempt to play with Atmel stuff, so I am a very beginner here.
Thanks for your help
Jim
OK, Never mind… I just found my mistake. For others that may fall on the same trap, here is a description of my mistake.
Atmel Studio 7 can be started in Advance Mode or Standard Mode. I had it in Standard Mode, hence, could not see the menu.
It’s now fixed and I can apply the method.
I am still hoping to get an answer to the AVRdude question. Thanks
I am so exited to have this Atmel Studio 7 working together with my Sparkfun USB Tiny programmer and ATtiny 85, I could not resist posting it!
This is the line I used: -c usbtiny -p t85 -v -v -v -U flash:w:$(TargetDir)$(TargetName).hex:i
I had to install Arduino IDE and follow Studio 7 instructions to import an Arduino sketch.
And it worked ! I got this LED flashing ! Good stuff !
Hey Jim
Thanks so much for your comments, and for sharing your success! I’m really pleased that you got this all working with the ATtiny85… I guess that the time-zone difference (I’m in South Africa) played in your favour as you got the solution before me!
Now that you’re up and running with Atmel Studio, I think you’ll find a whole new world will open up. Next challenge is to start a project without importing from an Arduino sketch – that’s where the real fun lies!
Cheers from sunny South Africa
Andrew
Hi Andrew,
These steps saved me a lot of time!
After finally getting a programmer going today, I am following your N&V series — I had the same challenges as a couple others here (the blink interval / delay being extremely long until I deprogrammed CKDIV8 fuse bit, and I could not find Atmel Studio 7 “Tools|External Tools” menu item until I set Advanced option.
Getting to this point was just the right number of challenges such that I learned some things about the MCU — without getting frustrated.
I’m moving on through the rest in your series with the Atmel-ICE next, fun stuff.
Thanks for your contribution, Ronan
Hi
IIs there a way to program the flash and then the fuse bits?
Eg: -c usbtiny -p m328p -v -v -v -U flash:w:$(TargetDir)$(TargetName).hex:i lfuse:w:0xE2:m hfuse:w:0xD9:m efuse:w:0x05:m
Thanks
Richard
Hi Richard
Thanks for leaving a comment. I haven’t tried it, but a quick search found that others have programmed the flash and fuse bits in a single command. The parameters that you put there should do the trick (I’m not near my workbench right now), although you would need to add a “-U” before each lfuse hfuse efuse parameter:
-U lfuse:w:0xE2:m -U hfuse:w:0xD9:m -U efuse:w:0x05:mGood luck – and please post back if it works.
Cheers
Andrew
Hi Andrew
That worked.
Awesome, thanks.
Richard
Hi, i want to ask you something
why i always get this message when i want to start without debugging
The message is :
“Exception of type ‘System.Exception’ was thrown”
hello guys, this is the correct setup for U parameter:
-U flash:w:”$(TargetDir)\$(TargetName)”.hex:i
here is my working Arguments, for Uno on Com4, (change them if necessary for your profile):
-C “C:\Program Files (x86)\Arduino\hardware\tools\avr\etc\avrdude.conf” -v -p atmega328p -c arduino -P COM4 -b 115200 -D -U flash:w:”$(TargetDir)\$(TargetName)”.hex:i
Hello Andrew,
I appreciate the ‘well-Made’ and ‘well -Explained’ video. Super Simple…Super Clear …Good Job !!
I’m trying to get ATMEL studio to work with My DIGISPARK via VUSB. Arduino has a library ( along with Micronucleus Boot Loader recognition ) and Board definition that makes it easy to Plug in the DIGIPARK board, directly to my computer USB hub and Program the board, with Aurduino IDE. That is so cool…like Science Fiction !!!! No programer or anything needed. All components for programming are built-in, on the Board, the size of the nail on my thumb …Wow .
I now want to take those same libraries and files and Plug it into ATLMEL STUDIO…but I cant figure out how to do it… Do you think you could manage the time to get that working and show us how?
Kind Regards,
MM
Hey MM
Thanks for the compliment. Unfortunately I know very little about the DigiSpark but perhaps another reader does – let’s see if anyone else can take up the challenge of your query!
Cheers
Andrew
Hi there,
I did eversthing as descibed,
when I try to upload my programm it seems to do right,
the USBtiny is blinking, the nano is blinking,
Output says a lot of things about reading and writing, fuses and
no interesting data and so on,
no error is reportet
but there seems to be no effect on the nano,
it is still executing a previously loaded sketch
any ideas?
thanks
Helmut from Germany
This also works for ATMEL STUDIO 7 and WINAVR