
Arduino Tutorial – Chapter 1.1: Getting Started
What is an Arduino?
In the simplest of terms, an Arduino is a tiny computer that is designed to interact with its physical environment. This means that it can sense things around it (for example, sound, light, temperature, touch) and react to these based on your instructions. This sounds a little abstract, so let’s look at a few examples. Arduino can:
- switch the lights on when it gets dark, and off when it’s light again
- close the blinds in a room when it’s too warm and sunny
- switch on a pump to water your plants when the soil gets too dry
- switch on your heater at a certain time, if it’s a cold day
- drive a robot around a room, avoiding obstacles
- detect intruders and then send you an SMS, flash lights, sound alarms, and spray the intruders down with the garden sprinklers!
Different Models
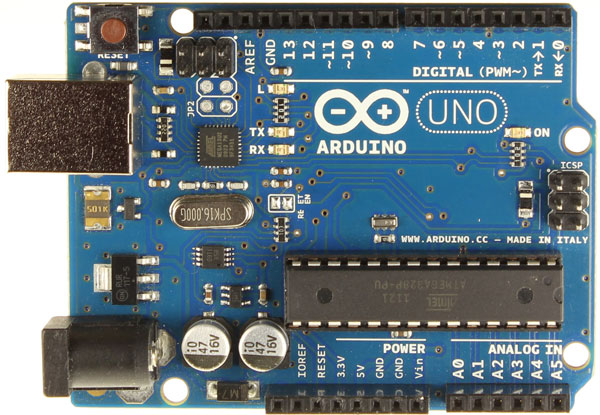
There isn’t just one “Arduino” – there are many different models, each with different advantages. The most popular one to get started with – and the one we’ll be focussing on during this tutorial – is the Arduino UNO R3.
Some Background on the Arduino
Arduino was developed by a team made up of Massimo Banzi, David Cuartielles, Tom Igoe, Gianluca Martino, and David Mellis over 7 years ago, and has continued to grow in popularity since then. The fact that there are so many hardware options today, books available, blogs and projects published, shows just how clever the concept is.
Arduino is really a series of development boards containing microcontrollers ideally suited to sensing and reacting to world around them. Alongside the physical hardware of the boards, is a programming language that allows you to control how the board reacts to its environment. There are many other platforms and boards similar to Arduino (PICAXE, BASIC Stamp, etc.), but they don’t quite have the same set of advantages:
- Arduino is open-source, both on the hardware and software fronts, which makes the expansion and customisation options almost limitless
- The microcontrollers used are from the well-known Atmel ATMEGA series, which offers opportunities to up- and down-scale your projects
- Arduino is a relatively inexpensive platform – and as it’s open-source there are plenty of well-made clones as well as guides to help you build your own
- Arduino is a cross-platform development environment. Although this book will focus on the Windows platform, the development software runs on Linux and Macintosh OSX
Types of Arduino
There are a wide variety of boards that Arduino sell – simple ones to get you started, tiny ones to build into your projects, larger ones to control complex systems with many inputs and outputs, small wearable boards designed to be stitched into clothing, boards with Ethernet or Bluetooth connectivity, and more recently ones with tiny onboard Linux computers… and these are just the official Arduino boards.
There are many third-party boards that take the basic Arduino architecture and extend and expand it to create all sorts of tailor-made platforms. Take a browse on the Arduino website to see the variety that they sell, or do a search to see some of the other clones out there.
What do I need to get started?
Finding an Arduino
Arduinos are sold everywhere! I’ve listed a number of well-known stockists below, and ones that I’ve used in the past. Of course, as with all online retailers, you need to make sure that you’re comfortable that the store is reputable – the fact that these are listed here is meant to guide you, and not an endorsement. I’ve tried to select retailers that support open source projects:
- The Official Arduino Website
- Sparkfun Electronics sell official boards and clones, and have great resources online
- Adafruit Industries for official, clone and interesting in-house boards
- Micro Robotics, Netram Technologies or Hobbytronics for any other South Africans reading this
Of course all the big online retails – Farnell, Element14, Digikey, Mouser, RS Electronics, etc. all have them for sale.
Getting the Arduino up and running
Getting an Arduino up-and-running isn’t as simple as plug-and-play, but it’s pretty straightforward.
Firstly, you need your Arduino board. I recommend an Arduino UNO – the UNO R3 is the latest release of this board and is perfect for getting started. It is well-priced, but also gives you a good range of expansion options to allow you to turn out some complex projects. It’s a convenient size to work with, and has all the connections you’ll initially need without having to buy any additional plug-in boards.
Secondly, you need a USB cable. This allows you to connect your Arduino to your PC. A good retailer will either include the cable with the board, or give you a link to the correct cable to use. You need a USB A to B cable.
Thirdly, you’ll need a computer running Linux, MacOSX or Windows. We’ll be programming the projects from the computer.
Finally, you need an internet connection to download the Arduino drivers, as well as the Arduino software. The drivers are what allow your computer to “see” that your Arduino is connected and to then communicate with it. The software is an application that allows you to develop your sketches (a sketch is an Arduino programme), and upload them to the Arduino. I’ll touch on the software, called the Arduino Integrated Development Environment (IDE), in more detail shortly.
I’d suggest that you get the software and drivers installed now, by going to the Arduino web page. They have installation instructions which are quite straightforward for Windows, Mac OS X and Linux.
Meet the Arduino IDE
IDE stands for “Integrated Development Environment”. Sounds pretty daunting, doesn’t it? Well, it’s not – it’s actually really simple and very useful. The Arduino IDE is the application that you use to write sketches for your Arduino. It formats the sketch nicely for you, colour-codes key words so that the sketch is easy to read, and also tells you if you’ve written something your Arduino won’t understand – the Aduino only understands sketches that are written in a very specific way. If you’ve ever programmed a computer this will make sense to you – if not, don’t worry we’ll work through the rules together so that you understand exactly what you’re doing.
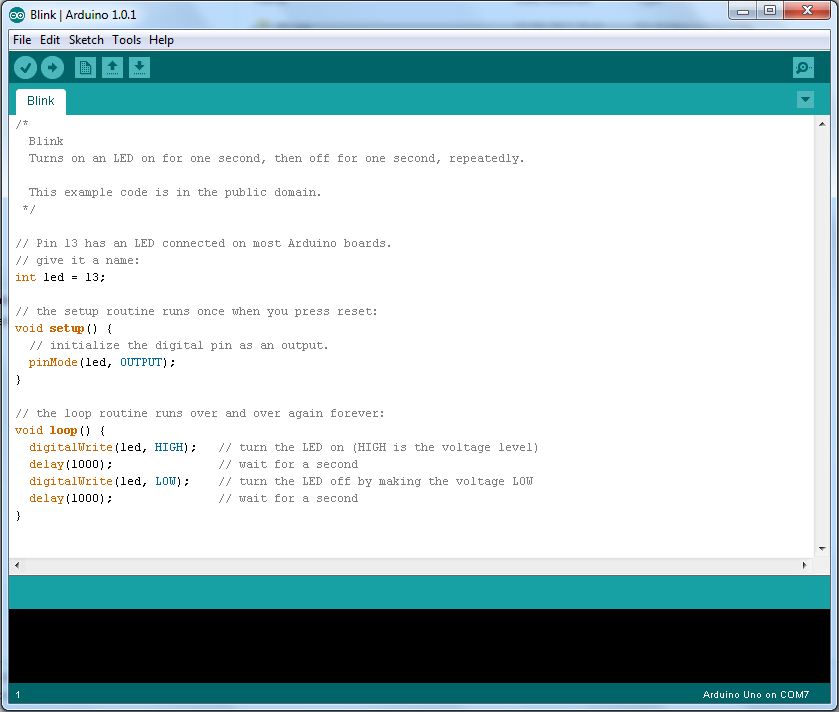
Once you’ve written and checked your sketch, you use the IDE to upload it to the Arduino. A few lights on the Arduino will flash, and it’ll then start carrying out the instructions contained in your sketch – very obedient! We’ll go into more detail on the IDE with our first project – it’s much easier to tackle the IDE with a real-life example.